[ATEX · REAL WORLD]
This is for anyone who’s been handed a piece of equipment on site, looked at the nameplate, and had absolutely no idea what they were reading.
Knowing how to read an ATEX nameplate is one of those things that rarely gets explained properly, until you’re standing in front of a piece of equipment that needs to go into a hazardous area and you need to confirm it’s suitable. The markings follow a consistent structure, and once you’ve worked through one, the rest follow the same pattern. This guide breaks down every part of an ATEX nameplate in the order it appears, with a worked example at the end.
Summary
- An ATEX nameplate tells you exactly what an item of equipment is certified for — but only if you know how to read it.
- The markings follow a specific order and each part means something different.
- Using the wrong equipment in the wrong zone isn’t just a paperwork problem.
- Most of the confusion comes from not knowing what to look for, not from the markings being complicated.
- Once you’ve read one nameplate properly, the rest follow the same pattern.
- From experience, some ATEX certificates are easy to read and the details are clear, with others, not so much. Some are also just not available unless requested which doesn’t help.
Need to check equipment for a specific zone?
Use the ATEX Equipment Selector
Why Nameplates Matter on Site
The nameplate is the fastest way to confirm whether a piece of equipment is suitable for the area it’s going into.
If the nameplate doesn’t match the zone classification, it doesn’t matter how it was specified on paper. The wrong equipment in a hazardous area is a real problem.
The nameplate is the evidence. If you can’t read it, you can’t confirm the equipment is correct. Confirming the equipment is correct is only part of it, the person doing the work also needs to be competent, and in the UK that means CompEx certification.
What a Typical ATEX Nameplate Looks Like
Most ATEX nameplates follow the same structure. Take this example:
Ex II 2G Ex d IIB T4 Gb
Different pieces of information, each one telling you something specific. Working left to right:
The Ex Mark
The hexagonal Ex symbol confirms the equipment has been certified for use in explosive atmospheres.
If this isn’t on the plate, the equipment isn’t ATEX certified. Stop there.
Equipment Group (I or II)
- Group I: mining — equipment for underground environments where methane or coal dust is the hazard
- Group II: surface industries — everything else, which is what most site engineers deal with
You’ll almost always be looking at Group II on a standard industrial site.
The category maps directly to the ATEX zones the equipment can be used in, so confirming the zone first tells you the minimum category you need.
Equipment Category (1, 2, or 3)
This tells you which zones the equipment can be used in.
- Category 1: Zone 0 (and also Zone 1 and Zone 2)
- Category 2: Zone 1 (and also Zone 2)
- Category 3: Zone 2 only
A Category 2 item can go into Zone 1 or Zone 2. A Category 3 item can only go into Zone 2. Higher categories can always cover lower-risk zones, not the other way around.
Gas or Dust (G or D)
- G: certified for gas, vapour, or mist atmospheres
- D: certified for dust atmospheres
Some equipment carries both, but most will be one or the other. Make sure it matches your hazard type.
Protection Method (Ex d, Ex e, Ex n, and others)
This is how the equipment is designed to prevent ignition. Common ones you’ll see on site:
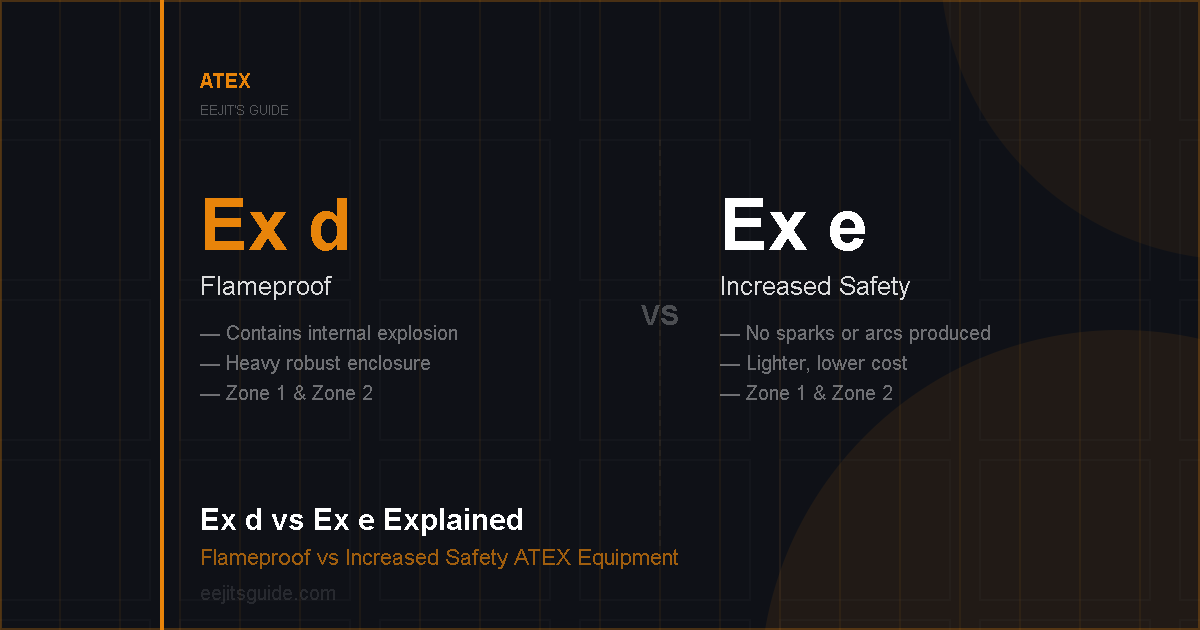
- Ex d – flameproof: the enclosure contains any internal explosion and prevents it spreading
- Ex e – increased safety: no sparks or arcs are produced, and the design reduces the chance of faults occurring
- Ex n – non-sparking: lower protection, suitable for Zone 2 only during normal operation
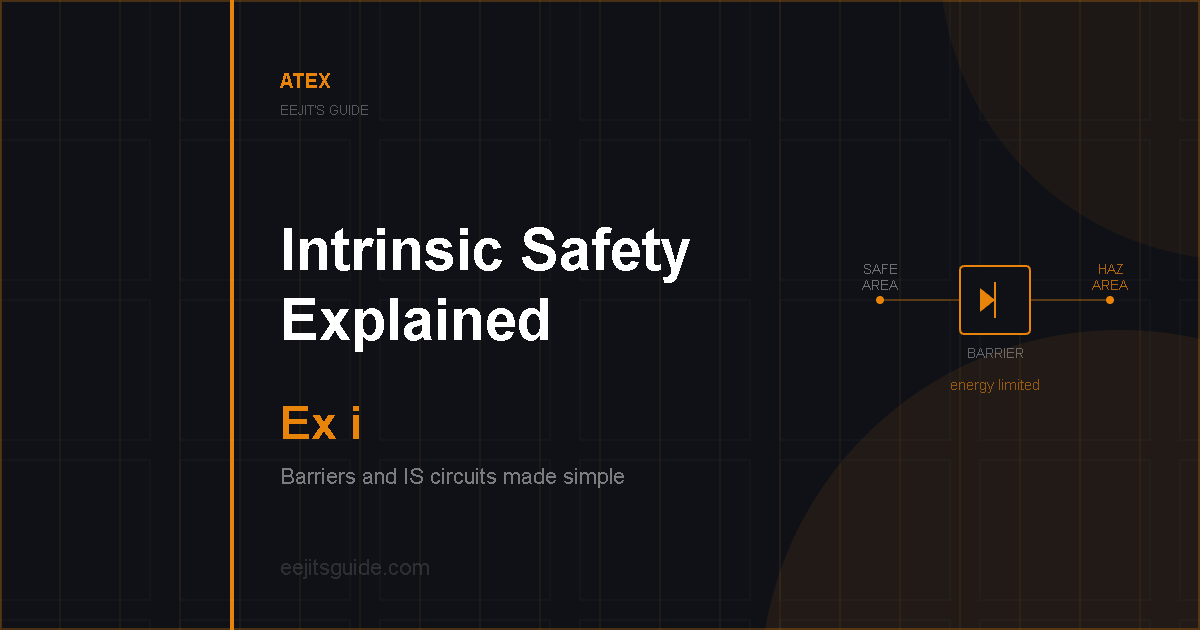
- Ex i – intrinsic safety: limits energy in the circuit so it can’t ignite the atmosphere
- Ex p – pressurisation: keeps the enclosure at positive pressure to prevent gas ingress
There are others, but those five cover most of what you’ll encounter on a typical site.
Gas Group (IIA, IIB, or IIC)
This defines which gases the equipment is certified to be safe around.
- IIA: covers gases like propane — least restrictive
- IIB: covers gases like ethylene — mid-range
- IIC: covers gases like hydrogen and acetylene — most restrictive
IIC equipment is certified for all gas groups. IIA equipment is only certified for IIA gases. The gas group on the nameplate has to match or exceed the gas group in your area classification.
Common mistake: assuming IIB equipment covers everything. It doesn’t cover IIC gases. If the area is IIC, the equipment has to be IIC.
Temperature Class (T1 to T6)
This is the maximum surface temperature the equipment can reach. It has to stay below the ignition temperature of the gas present.
- T1: max surface temperature 450°C
- T2: 300°C
- T3: 200°C
- T4: 135°C
- T5: 100°C
- T6: 85°C
T6 is the most restrictive. If the gas has a low ignition temperature, you need equipment with a lower maximum surface temperature to match.
For a full breakdown of what each temperature class (T1-T6) means and how to match it to your gas data, see the dedicated guide.
EPL — Equipment Protection Level (Ga, Gb, Gc)
This is a newer addition and isn’t always present on older equipment. It gives a more precise indication of the protection level:
- Ga: very high protection — for Zone 0
- Gb: high protection — for Zone 1
- Gc: enhanced protection — for Zone 2
If you see it, it maps directly to the zone classification. If it’s not there, the category marking still tells you what you need to know.
Reading a full ATEX nameplate, worked example
Going back to the example from earlier:
II 2G Ex d IIB T4 Gb
- II — Group II, surface industry
- 2G — Category 2, gas atmosphere. Suitable for Zone 1 or Zone 2.
- Ex d — flameproof protection method
- IIB — certified for IIA and IIB gases (not IIC)
- T4 — maximum surface temperature 135°C
- Gb — high protection level, Zone 1 equivalent
That’s a completely readable nameplate once you know the order.
Older equipment may use the previous marking system, the structure looks different but has similar meanings, and if you’re unsure, best to check the certificate. Older equipment with legacy markings can still be valid, it’s the certificate that confirms it, not whether the format looks modern. Typically it has eex
Common Mistakes When Checking Nameplates on Site
Mistake #1 – Only checking the Ex mark and nothing else
The Ex mark confirms certification. It doesn’t confirm suitability. You still need to check the category, gas group, and temperature class against the area classification.
Mistake #2 – Assuming the gas group carries across from a previous job
Gas group has to be confirmed for each site. Using IIB equipment in an IIC area because it worked somewhere else is not a valid justification.
Mistake #3 – Ignoring the temperature class
This one gets missed more than it should. If the gas present has an ignition temperature below the equipment’s maximum surface temperature, the equipment is not suitable, regardless of every other marking. Think of it as an overall system, it fails due to the weakest part in the system.
Mistake #4 – Not checking the full certificate
The nameplate is a summary. The certificate has the full detail. If you’re not sure, pull the certificate and check the specific conditions of use. Typically it details mounting requirements or electrostatic considerations.
Mistake #5 – Check the output current
Solenoid drivers are the worst offenders for this. Check that the output actually drives what you are connecting. There should be a characteristic curve in the manual. Check the voltage against the current output.
The nameplate tells you most of what you need. The certificate tells you the rest. Both matter.
Final Thought
Reading an ATEX nameplate isn’t difficult once you know what each part means and the order it appears in.
The problems usually come from only checking part of it, or from assuming the equipment is fine because it looks similar to something used before.
A nameplate check takes about thirty seconds. Getting it wrong takes a lot longer to fix.
Not sure which zone your equipment needs to be rated for?
Use the ATEX Equipment Selector
If you want the detail on the two you’ll see most often, this guide breaks down the protection methods like Ex d and Ex e and when each is used.

Leave a Reply